Scanning malicious websites with 'infinite' number of VPN tunnels (Part 1)
I pay for 10 VPN connections. I use all 10 VPN connections.

Continuing the theme of “I pay for whole XXX, I use whole XXX”.
It All Started From an Unsolicited Email
One day, soon after I lost my job, I received this surprise email from NordVPN:
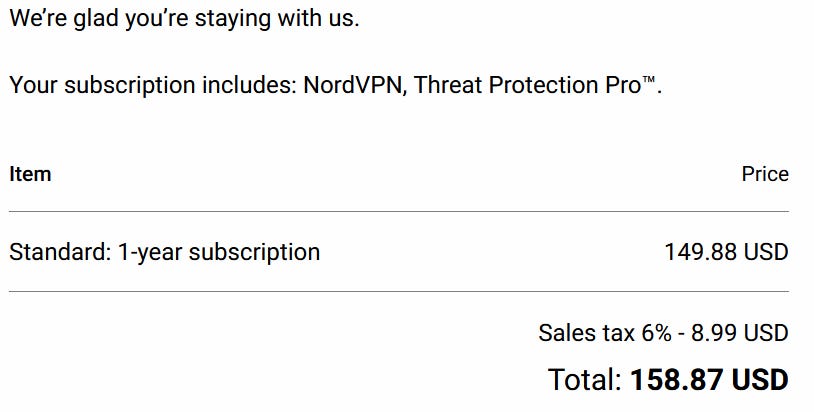
Not even a warning, or a ‘Your subscription will be renew in 7 days’ email. Just like that I was out of $158.87. Really NordVPN, $158.87 for 1 year of VPN service? For a broke who just lost his job, $158.87 is a huge chunk of money.
I groaned unhappily and, instead of disputing the charge with my credit card company, was thinking of what’s the best legal way to get back at NordVPN. I will make sure this will be the most expensive $158.87 they have ever made.
The best way, I figure, is to have their customers get their money’s worth. They pay for NordVPN services, they shall use all of NordVPN services.
In NordVPN’s FAQ, they have a page on the maximum number of concurrent connections per account:
A total of ten devices can be connected using one NordVPN account at the same time, enabling NordVPN account sharing within families.
10 devices, you say.
World-wide IP Sensors
In a previous life, when I was working for a major security company, I was tasked with keeping track of all the HTTP-based threat actors around the world.
I designed and implemented a system that would automatically discover, track, and monitor all threats with a sub 60 minutes requirement. Furthermore, the systems was high throughput, completely autonomous (since I had other duties I had to fulfill,) automatically detect to threat actors’ updates and respond automatically, and most importantly, did it with a minimal budget.
An important part of that system was the IP sensors/exit points. Threat actors want to maximize their attack audience, and minimize the number of pesky security systems enumerations. As such, malicious infrastructure have many ways to filter suspected connection attempts. The most crude way is IP blocking-
Residential IP only. Filter IP range owned by known security companies’, military, education organizations, cloud companies, etc.
Source/Target active hours. Hours that the attackers or the targets are active and working.
Geo-blocking
Host fingerprinting
IP cool down
Any IP sensors used by the security detection system should have countermeasures against IP blocking.
Early on, from testing I determined 1. is the most important factor, with 3. and 2. lower in priorities. 4. is used by some groups, but the proliferation of internet middleboxes have made this unreliable. 5. is a serious issue since a malicious server might stop responding to a victim IP once a payload is delivered, from an hour all the way to weeks. This means there should be a group of similar exit IPs on standby.
I started asking folks in company offices around the world to setup Linux boxes in their offices, connect the boxes to the office backup WAN (usually a residential cable/DSL ISP), and give me root SSH access to those boxes. I would install OpenVPN servers on them (pre-Wireguard), and my detection system would use these servers as camouflaged exit IPs (predates RaspPi exit node). This worked fine initially, but as the detection system grew, the traffic started to saturate those office links, and I needed more geographical representations. I had to find a legal, low cost, and diverse array of IP exit points that won’t ban my account or violate any EULA. This is where I first started dealing with VPN companies.
VPN Companies
As I mentioned, this predates Wireguard. Back then, to connect to a VPN company’s proxy server, the company would either provide a badly written tunnel GUI application, or ask you to download a zip file that contains all their .ovpn (OpenVPN) config files. Then you manually install the OpenVPN client on your desktop/router, load the .ovpn file of your choice, and connect to the VPN server.
This works fine for most users, but my system needed to use multiple exit points at the same time- by my estimate I needed at least geographically different 30 exit IPs to provide an accurate view of the threat landscape. Most VPN companies back then only allowed 2-5 concurrent device connections. More importantly, the VPN companies must neither scan/block the malicious traffic or ban my VPN account (for trafficking mostly malicious traffic.)
Finding and testing VPN companies was worthy of an article itself, but I digress.
(This is where I first dealt with NordVPN. They allowed 7 tunnels per account; they were relatively low cost; they have servers around the world; and they don’t care if my traffic is potentially malicious.)
Old Fashion Linux Routing
Going back to the detection system. The detection system had a single Linux gateway (I also used my company’s firewall products as part of this gateway.) The gateway would, at any point, run about 50-80 instances of OpenVPN clients (in addition to other exit methods’ exit nodes.) Each OpenVPN client would connect to a proxy server but overrides the server’s routing script. Instead the client would execute a routing config script that initializes a custom Linux routing table using iproutes2.
Policy Based Routing (PBR) was used to steer a connection to a particular exit node. A IP rule is added- packets with certain IP attributes (such as if srcIP is within an IP range) is forwarded using a custom routing table.
When the detection system wants masquerade as a connection from a specific region, the system would use a particular WAN interface with a specific source IP. The gateway would receive the packet and route the packet according to the IP rule for that source IP. Finally a NAT gateway sits at the end of that pipeline to route the packet to the public internet.
When the system needs to change its configuration strategy (eg. Asian office hour is over), it would tear down some tunnels and start up other tunnels. The system also had limited ways to refresh its proxy servers database, and can dynamically shift traffic from tunnels to (groups of) tunnels based on certain scenarios/manual commands/detection.
All in all, the detection system worked extremely well, the system had over 80 concurrent exit nodes around the world, and costed the my employer very little (lots of small BTC payments to shady VPN companies.) Way less than, say, semi-legal Residential Proxy Network companies with per/GB cost that made satellite data cost looked cheap.
The setup was very labor intensive, however.
Can I recreate the setup with minimal work today?
Modern Day VPN
First of all, OpenVPN has been mostly replaced by Wireguard. This is an issue as while OpenVPN supports both TUN and TAP interface (layer 3 and 2), Wireguard only supports layer 3 traffic. This means no more IPv6/multicast/ICMP/ARP shenanigans.
In return, Wireguard is much more reliable and pleasant to use. Its connection performance is also much better, which means more traffic can traverse through a Wireguard tunnel. Connection recovery is also builtin to the protocol, so no more elaborate state machine for the various failure states in an OpenVPN connection lifecycle.
Network namespace is also ‘new’. When I implemented the previous system, I had to use cgroup v1 directly to provide better separation between tunnels. Whereas I can ‘sort of’ isolate each Wireguard tunnel in network namespaces (I say sort-of because Wireguard touches parts of kernel that is shared across all network namespaces, so I need to put in workarounds.)
NordVPN also increased their concurrent number from 7 to 10. I see other companies offer unlimited connections, but since NordVPN already stolehas my money, I will use them as the example in this post.
Prototype
With all these in mind, I wrote a simple PoC script to setup 5 VPN tunnels. Yes it’s a SysV init script since I was using it elsewhere:
#!/usr/bin/env bash

set -ex

[[ $UID != 0 ]] && exec sudo -E "$(readlink -f "$0")" "$@"

NS="vpn"
WGIF="wg"
gatewayIP="172.30.30."
wgIP=(10.5.0.2/32 10.5.0.2/32 10.5.0.2/32 10.5.0.2/32 10.5.0.2/32)

up() {
    brctl addbr br0 || true
    brctl addif br0 ens20 || true

    echo 1 > /proc/sys/net/ipv4/ip_forward
    for ((i=0;i<${#wgIP[@]};i++));
    do
        WGCONF="/etc/wireguard/$WGIF$i.conf"
        ip netns add $NS$i
        ip link add $WGIF$i type wireguard
        wg setconf $WGIF$i $WGCONF
        ip link set $WGIF$i netns $NS$i
	ip link add name vethhost$i type veth peer name vethvpn$i
	ip link set vethhost$i up
	ip link set vethvpn$i up
	ip link set vethvpn$i netns $NS$i
	brctl addif br0 vethhost$i

        ip -n $NS$i addr add ${wgIP[$i]} dev $WGIF$i
        ip -n $NS$i link set lo up
        ip -n $NS$i link set $WGIF$i up
        ip -n $NS$i link set vethvpn$i up
        ip -n $NS$i route add default dev $WGIF$i
        ip netns exec $NS$i bash -c "echo 1 > /proc/sys/net/ipv4/ip_forward"
	ip netns exec $NS$i ip addr add $gatewayIP$(($i + 1))/24 dev vethvpn$i
        ip netns exec $NS$i iptables -w -t nat -A POSTROUTING -o $WGIF$i -j MASQUERADE
        ip netns exec $NS$i iptables -w -A FORWARD -i vethvpn$i -j ACCEPT
    done
}

down() {
    for ((i=0;i<${#wgIP[@]};i++));
    do
        ip -n $NS$i link set $WGIF$i down
        ip -n $NS$i link del $WGIF$i
	sleep 1
        ip netns del $NS$i
    done
}

status() {
    for ((i=0;i<${#wgIP[@]};i++));
    do
        ip netns exec $NS$i wg
    done
}

execi() {
    exec ip netns exec $NS$1 sudo -E -u \#${SUDO_UID:-$(id -u)} -g \#${SUDO_GID:-$(id -g)} -- "${@:2}"
}

command="$1"
shift

case "$command" in
    up) up "$@" ;;
    down) down "$@" ;;
    exec) execi "$@" ;;
    status) status "$@" ;;
    *) echo "Usage: $0 up|down|exec" >&2; exit 1 ;;
esac
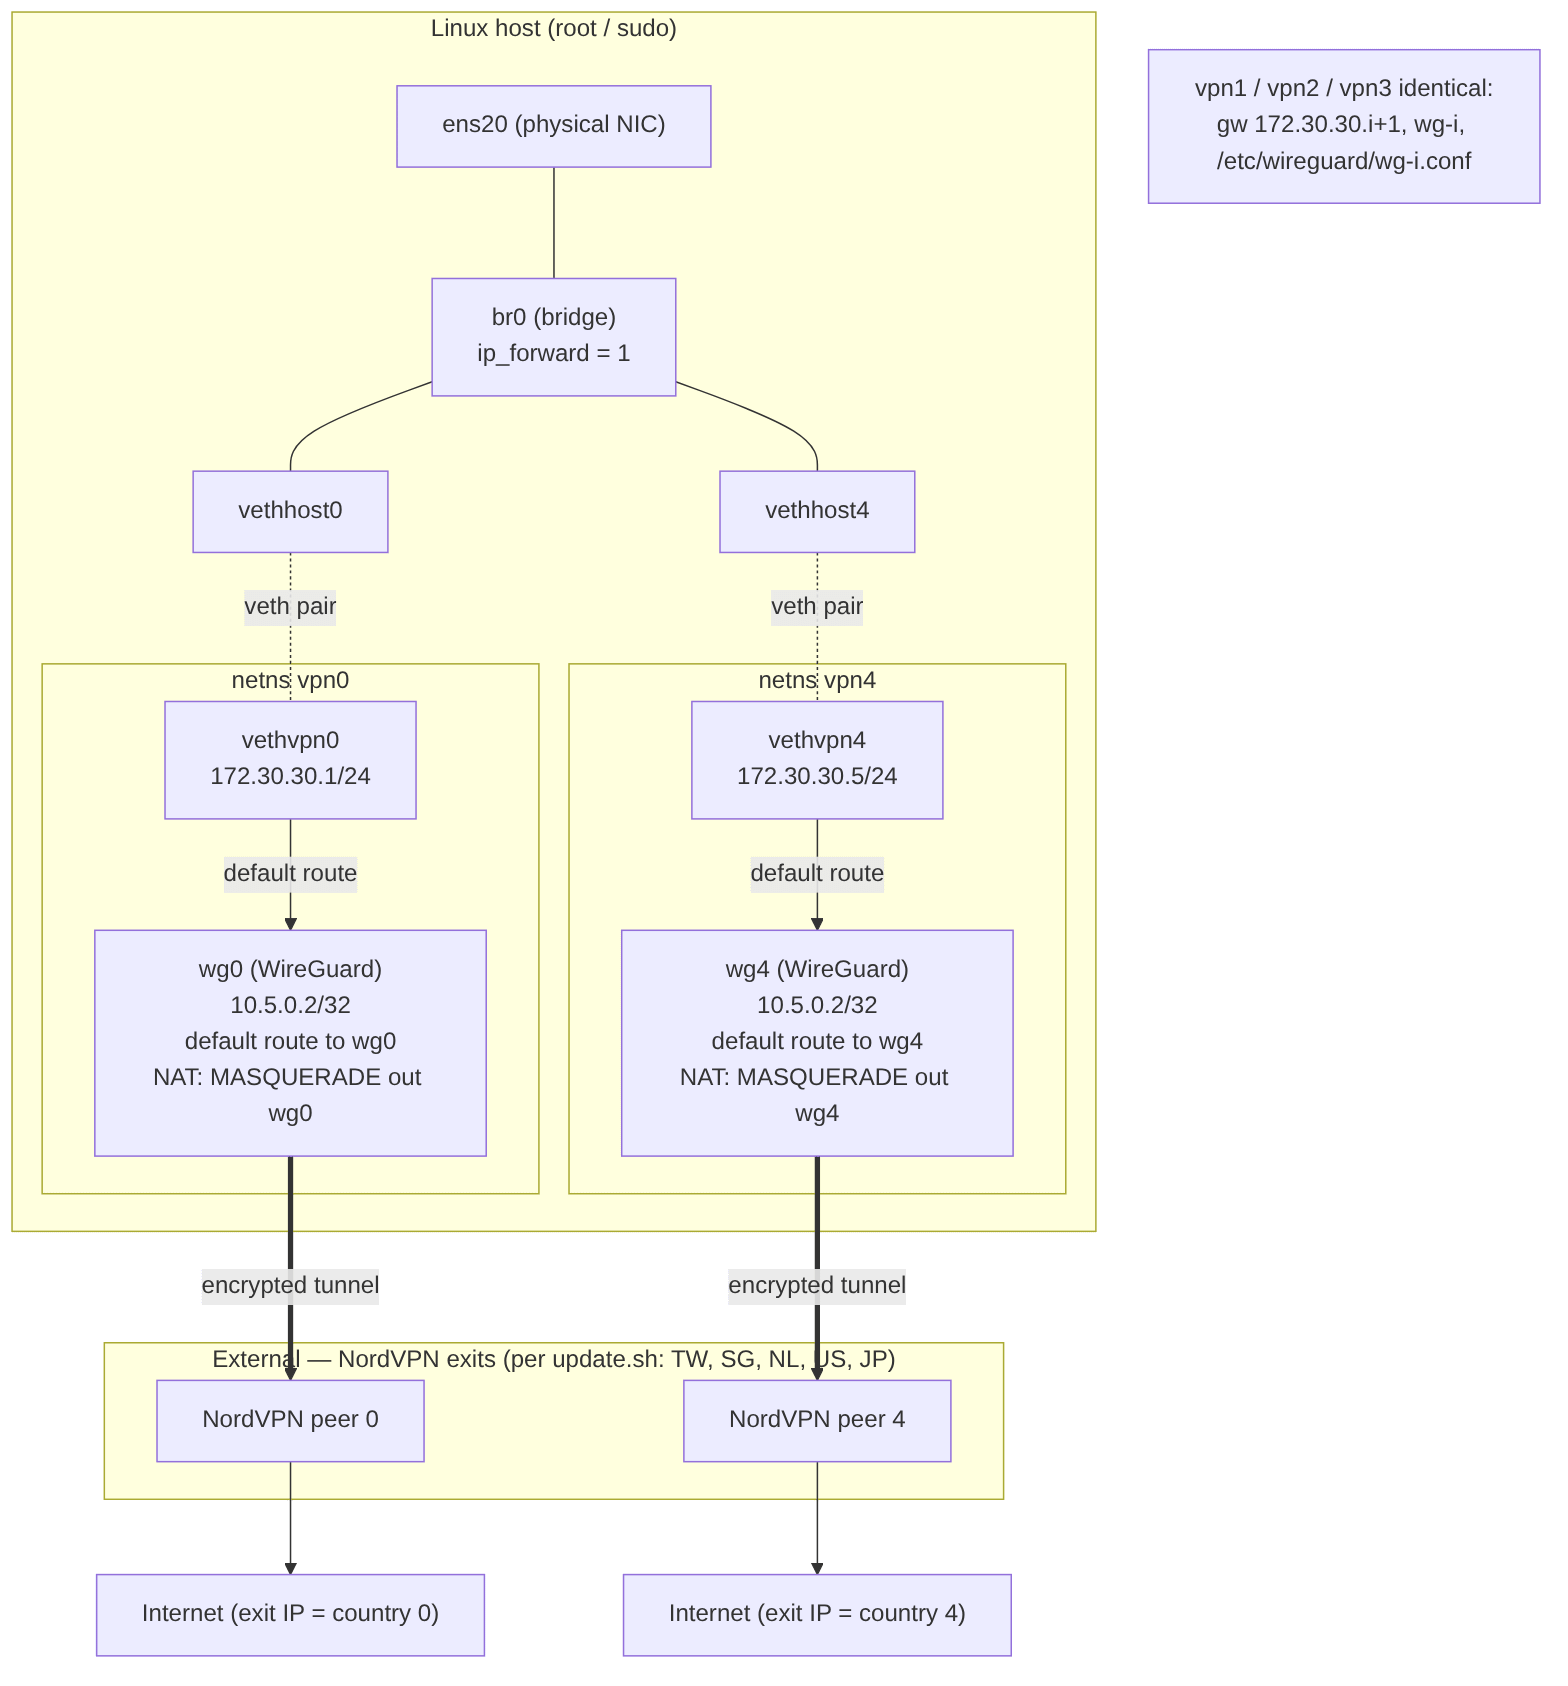
Packet flow (egress)
1. Client traffic enters the host on “ens20” interface → “br0” bridge.
2. Routed to a namespace’s gateway “172.30.30.{i+1}” across the
“vethhost{i}↔vethvpn{i}” virtual Ethernet interface pairs.
3. Inside each vpn{i} namespace, the default route points at wg{i} interface, so all traffic enters the WireGuard tunnel.
4. “iptables -t nat MASQUERADE” rewrites the source to the tunnel address;
“FORWARD” accepts from vethvpn{i} interface.
5. Packet exits encrypted to the NordVPN peer, which NATs it to the chosen
country’s public IP.
Because I am lazy, I also wrote a simple script to update the NordVPN server configuration files. Note that your SSH connection to the host will be interrupted as NordVPN doesn’t support traffic splitting:
#!/bin/bash

#nordvpn login --legacy
apt -y update
apt -y upgrade
nordvpn set technology nordlynx

nordvpn connect Taiwan
sleep 2
sudo wg show && sudo wg showconf nordlynx > /etc/wireguard/wg0.conf
sleep 2
nordvpn disconnect
sleep 2

nordvpn connect Singapore
sleep 2
sudo wg show && sudo wg showconf nordlynx > /etc/wireguard/wg1.conf
sleep 2
nordvpn disconnect
sleep 2

nordvpn connect Netherlands
sleep 2
sudo wg show && sudo wg showconf nordlynx > /etc/wireguard/wg2.conf
sleep 2
nordvpn disconnect
sleep 2

nordvpn connect United_States
sleep 2
sudo wg show && sudo wg showconf nordlynx > /etc/wireguard/wg3.conf
sleep 2
nordvpn disconnect
sleep 2

nordvpn connect Japan
sleep 2
sudo wg show && sudo wg showconf nordlynx > /etc/wireguard/wg4.conf
sleep 2
nordvpn disconnect
sleep 2

#reboot now
Output
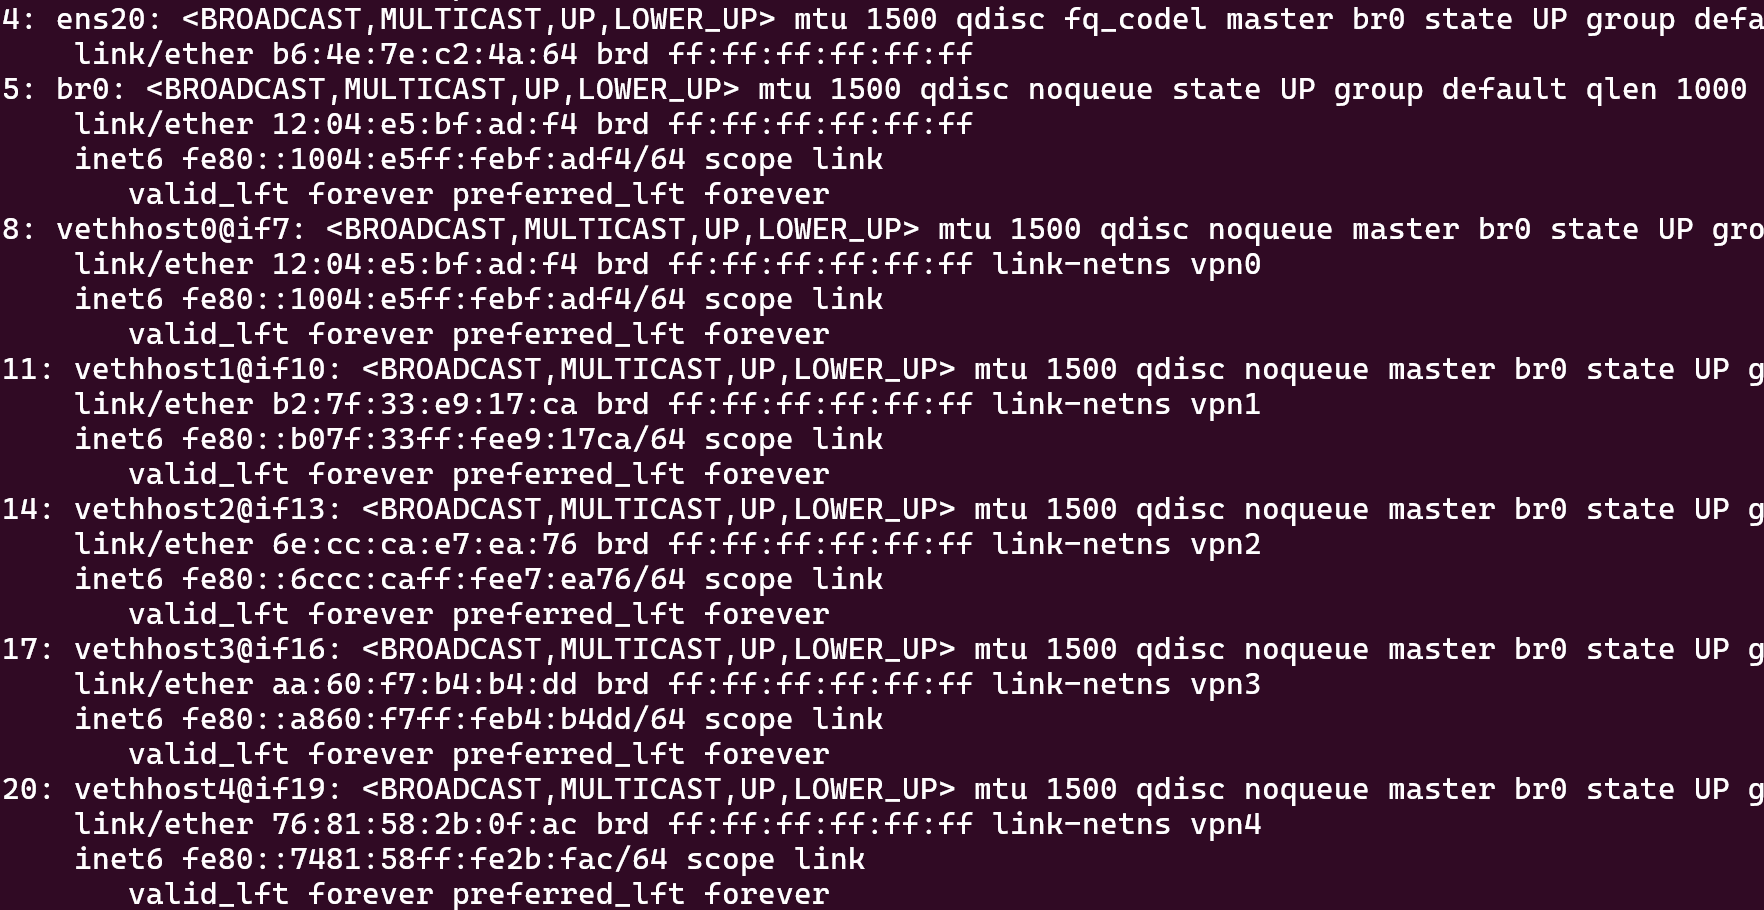
Here is the script running on a VM:
Here are the public IPs of all 5 tunnels:
for ns in vpn0 vpn1 vpn2 vpn3 vpn4; do
  echo -n "$ns: "; sudo ip netns exec $ns curl -H "Host: whatismyip.akamai.com" http://23.51.121.238;echo "";
done
Great! Now we have established 5 VPN tunnels to proxies around the world. We can execute an executable in the namespace and the traffic from that executable will be routed to that proxy server.
Next post in the series:
I will present a tool that generalize the tunnel setup (Assisted by Claude Opus 4.8 since Fable decided this is cybersecurity work.) I will also demo a sample PoC application that would collect data on phishing websites by accessing them from different geographical regions.
(Github New Repository function is down so I can’t upload the tools. I will end the post here for now and continue in Part 2 of the series.)